Thursday, August 22, 2024

HOW TO ADD CINEMATIC BLUR ON ANDROID || BEST FREE APP FOR BLUR VIDEOS 2024

 HOW TO ADD CINEMATIC BLUR ON ANDROID || BEST FREE APP FOR BLUR VIDEOS 2024

How to Add Cinematic Blur on Android Using Pretty Up App

In the age of digital photography, achieving a professional and cinematic look for your photos has never been easier. One popular effect that adds a touch of drama and sophistication is the cinematic blur. This technique focuses on creating a shallow depth of field, making your subject stand out against a beautifully blurred background. If you’re using the Pretty Up app on Android, you're in luck! Here’s a step-by-step guide to adding that stunning cinematic blur effect to your photos.

1. Install the Pretty Up App

Before diving into the editing process, make sure you have the Pretty Up app installed on your Android device. You can find it on the Google Play Store. Once installed, open the app and grant it the necessary permissions to access your photos.

2. Select Your Photo

  1. Open Pretty Up: Launch the app from your home screen or app drawer.
  2. Choose a Photo: Tap on the gallery icon or the “+” button to select the photo you want to edit. Pretty Up will open your photo library for you to choose from.

3. Access the Blur Tool

  1. Open the Editing Menu: Once your photo is loaded, tap on the ‘Edit’ button (usually represented by a pencil or similar icon).
  2. Find the Blur Tool: Look for the ‘Blur’ or ‘Effects’ tab in the editing menu. In Pretty Up, this tool is often located under ‘Tools’ or ‘Enhancements.’

4. Apply Cinematic Blur

  1. Select the Blur Type: Pretty Up may offer different types of blur effects. Look for options like ‘Gaussian Blur’ or ‘Lens Blur,’ which can mimic the cinematic look. The ‘Lens Blur’ is typically more suited for this effect.
  2. Adjust the Blur Strength: Use the slider to adjust the intensity of the blur. For a cinematic effect, you’ll want a strong blur that creates a noticeable separation between the subject and the background.
  3. Define the Focus Area: Most apps allow you to specify the area you want to keep in focus. Use the brush or selection tool to mark the area of the photo that should remain sharp. Everything outside this area will be blurred.
  4. Fine-Tune the Effect: Adjust the blur’s gradient or the transition between the focused and blurred areas. A smooth transition will give your photo a more natural, cinematic feel.

5. Enhance Your Photo

  1. Additional Adjustments: After applying the blur, you might want to tweak other aspects of your photo. Pretty Up offers options to adjust brightness, contrast, saturation, and more. Make these adjustments to enhance your photo further.
  2. Add Filters: To give your photo an even more cinematic touch, consider applying filters. Pretty Up provides various filters that can complement the blur effect and give your photo a cohesive look.

                                                                                                             DOWNLOAD

6. Save and Share

  1. Preview Your Photo: Before finalizing, preview your photo to ensure you’re happy with the blur effect and any other adjustments.
  2. Save Your Edits: Tap on the save or export button to save your edited photo. Pretty Up usually offers options to save in different resolutions.
  3. Share Your Creation: Share your beautifully edited photo directly from Pretty Up to your social media platforms or with friends and family.


Sunday, January 21, 2024

TOP 100 BEST CAMERA RAW PRESETS FREE DOWNLOAD 2024

                     FULL TUTORIAL ON YOUTUBE

How To Install Camera RAW Presets In Photoshop

Do You Want To Install And Use Adobe Camera Raw (ACR) Presets On Your Windows Or Mac Computer? With The New .XMP Format, Adobe Now Allows You To Use Presets Directly In ACR (Version 10.3 Or Newer

After Downloading And Unzipping My Camera Raw Presets, You Will Notice That There Are Three Folders Included: Two Folders For Adobe Lightroom And Lightroom Classic (.Lrtemplate And .XMP Format) And One With Adobe Camera Raw (ACR) Presets For Adobe Photoshop In Version 10.3 Or Newer.

How to Install and Use Camera RAW Presets in Photoshop

Installing Presets In Adobe Camera Raw 10.3+ (Windows)

  • Navigate To The Following Location On Your Computer: "C:\Users\UserName\AppData\Roaming\Adobe\CameraRaw\Settings" And Leave This Window Open.
  • Go To The Location Where You Unzipped Your Presets And Open The ACR Presets Folder, Usually Named 'Photoshop - Adobe Camera Raw (ACR) Presets'
  • Select The Desired Preset Folder(S) Containing The XMP File(S) And Press CTRL+C To Copy Them
  • Go Back To The Window Where You Opened The 'Settings' Folder And Hit CTRL+V To Paste The Folder(S) Inside. Now You Should Have The Folder(S) With The Preset Name (For Example 'Presets By Sarkar Editz -') Inside The 'Settings' Folder
  • Start Photoshop And The Presets Are Ready For Use

Installing Presets In Adobe Camera Raw 10.3+ (Mac)

  • Open A New Finder Window And Go To "UserName > Library > Application Support > Adobe > Camera Raw > Settings", And Leave This Window Open. (If The 'Library' Folder Is Not Visible, You Can Access It By Following The Steps In This Adobe Article.)
  • Go To The Location Where You Unzipped Your Presets And Open The ACR Presets Folder, Usually Named 'Photoshop - Adobe Camera Raw (ACR) Presets'
  • Select The Desired Preset Folder(S) Containing The XMP File(S) And Press Command+C To Copy Them
  • Go Back To The Window Where You Opened The 'Settings' Folder And Hit Command+V To Paste The Folder(S) Inside. Now You Should Have The Folder(S) With The Preset Name (For Example 'Presets By Sarkar Editz') Inside The 'Settings' Folder
  • Start Photoshop And The Presets Are Ready For Use


src="https://blogger.googleusercontent.com/img/b/R29vZ2xl/AVvXsEi3c8wesvyhywLEqbW64qQsIilOITxGga6bvqc_Ad0iBgWpwqNwcETwKfgGh2tQEnSIjJAw5ctNbqYa1jFMBsHwVrGqJwzIvBlL8RsNMaM2acIuQC7AEVN0DBEkQ2-CXGZEiXB7hVepV5-sO286WfKm3vb2wWvZ5O9dJae4G5TxzXnWeL744eEYkcPyxQ/w400-h200/button-1187460_1280.png" style="background: rgba(192, 192, 192, 0.05); border: 2px solid rgb(230, 230, 230); font: inherit; height: auto; margin: 0px 0px 1.5px; max-width: 95%; outline: none; padding: 4px; position: relative; transition: all 0.6s ease-out 0s; vertical-align: middle;" title="https://drive.google.com/file/d/15_ADHDNF-Zyy_FDk0Bj077pkmrw7-mbD/view" width="400" />

THANKS FOR VISITING

vv

Wednesday, January 17, 2024

25 best dark moody photoshop xmp presets free download 2024


SO THIS PRESETS IS PREMIUM 

       
                           FULL TUTORIAL ON YOUTUBE👇👇                                    


How To Install Camera RAW Presets In Photoshop

Do You Want To Install And Use Adobe Camera Raw (ACR) Presets On Your Windows Or Mac Computer? With The New .XMP Format, Adobe Now Allows You To Use Presets Directly In ACR (Version 10.3 Or Newer)After Downloading And Unzipping My Camera Raw Presets, You Will Notice That There Are Three Folders Included: Two Folders For Adobe Lightroom And Lightroom Classic (.Lrtemplate And .XMP Format) And One With Adobe Camera Raw (ACR) Presets For Adobe Photoshop In Version 10.3 Or Newer 

.

How to Install and Use Camera RAW Presets in Photoshop atOptions = { 'key' : '0cefa16ff3f0cd02a1ec5cf682abbdaf', 'format' : 'iframe', 'height' : 90, 'width' : 728, 'params' : {} }; document.write(''); src="https://www.northlandscapes.com/files/images/articles/how-to-use-camera-raw-presets-in-photoshop-02.jpg" style="background: rgba(192, 192, 192, 0.05); border: 0px; display: block; font: inherit; height: auto; margin: 0px; max-width: 100%; padding: 0px; transition: all 0.6s ease-out 0s; vertical-align: baseline;" width="1520" />

Installing Presets In Adobe Camera Raw 10.3+ (Windows)

  • Navigate To The Following Location On Your Computer: "C:\Users\UserName\AppData\Roaming\Adobe\CameraRaw\Settings" And Leave This Window Open.
  • Go To The Location Where You Unzipped Your Presets And Open The ACR Presets Folder, Usually Named 'Photoshop - Adobe Camera Raw (ACR) Presets'
  • Select The Desired Preset Folder(S) Containing The XMP File(S) And Press CTRL+C To Copy Them
  • Go Back To The Window Where You Opened The 'Settings' Folder And Hit CTRL+V To Paste The Folder(S) Inside. Now You Should Have The Folder(S) With The Preset Name (For Example 'Presets By Sarkar Editz -') Inside The 'Settings' Folder
  • Start Photoshop And The Presets Are Ready For Use

Installing Presets In Adobe Camera Raw 10.3+ (Mac)

  • Open A New Finder Window And Go To "UserName > Library > Application Support > Adobe > Camera Raw > Settings", And Leave This Window Open. (If The 'Library' Folder Is Not Visible, You Can Access It By Following The Steps In This Adobe Article.)
  • Go To The Location Where You Unzipped Your Presets And Open The ACR Presets Folder, Usually Named 'Photoshop - Adobe Camera Raw (ACR) Presets'
  • Select The Desired Preset Folder(S) Containing The XMP File(S) And Press Command+C To Copy Them
  • Go Back To The Window Where You Opened The 'Settings' Folder And Hit Command+V To Paste The Folder(S) Inside. Now You Should Have The Folder(S) With The Preset Name (For Example 'Presets By Sarkar Editz') Inside The 'Settings' Folder
  • Start Photoshop And The Presets Are Ready For Use


https://drive.google.com/file/d/15_ADHDNF-Zyy_FDk0Bj077pkmrw7-mbD/view

THANKS FOR VISITING

Thursday, September 7, 2023

How to write Urdu in Photoshop | Every step explained

How to write Urdu in Photoshop | Every step explained

In this comprehensive tutorial, you'll learn the essential skills to write Urdu in Photoshop with ease. Whether you're a graphic designer, content creator, or simply someone interested in adding Urdu text to your images, this step-by-step guide has got you covered. We'll walk you through the entire process, from setting up your Photoshop workspace to selecting the right fonts and typing Urdu characters accurately.

Discover the tips and tricks for proper text alignment, resizing, and formatting to make your Urdu text look polished and professional. We'll also explore how to add special effects and styles to your Urdu typography to make your designs stand out.

By the end of this tutorial, you'll have the confidence and knowledge to effortlessly incorporate Urdu text into your Photoshop projects, unlocking new creative possibilities for your digital endeavors. Don't miss out on this valuable resource for mastering Urdu typography in Photoshop!


                WATCH FULL TUTORIAL


Want to know how to write Urdu in Photoshop? We will guide you on how to do that.

  • To write in Urdu, you have to download the Urdu keyboard in windows 10.
  • Open Adobe Photoshop and go straight into the preferences.
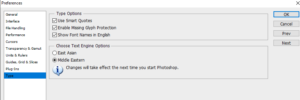
  • In preferences, you will find type option. Click on it and select Middle Eastern in choose the text engine option section.
  • After enabling the middle eastern language option, you can write Urdu in Photoshop.

Urdu is Pakistan national language and many people use Urdu for communication. INPage is the software used by people in Pakistan to write in Urdu language. People write Urdu text in INPage and then export it. After exporting that text they use Coral Draw or Adobe Photoshop to create Urdu graphic text.

Adobe Photoshop is a graphic designing software that allow people to create different things like logos, images, brochures etc. Adobe Photoshop allows users to edit their images and create new vector graphics.Advertisement: 0:14Close Pl

The logo of Photoshop

With time, Adobe has added the Middle Eastern and South Asian language feature in Adobe Photoshop but many people don’t know about it. They are still using INPage software to write Urdu. In this article, we will guide you on how to write Urdu in Photoshop without using INPage.

Installing Urdu keyboard in windows 10

To write Urdu in Photoshop without using INPage, you need to download the Urdu language pack in Windows 10. For Windows 7 it is different. To download Urdu language pack in Windows 10 you have to follow some steps.

  • Open windows setting app. Type setting in the search box and press enter to open it.
  • Click on Time & Language and then choose a language option.
  • Click on Add a preferred language and type Urdu.
  • Select Urdu Pakistan and click on install. Windows will install the Urdu language pack and you will see Urdu language keyboard option on the right side of the task-bar.
  • You can write Urdu if you have Urdu supported keyboard. If not then use the on-screen keyboard to write in the Urdu language.

Writing Urdu in Photoshop (Windows 10)

If you want to write Urdu in Photoshop then follow these steps. You must install Urdu keyboard first to write Urdu in Photoshop.

  • Open Adobe Photoshop.
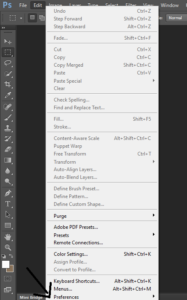
  • After opening it, choose edit.
  • After choosing the edit option, click on Preferences.

Screenshot from Adobe Photoshop Settings tab. This screenshot shows how t write urdu in photoshop.

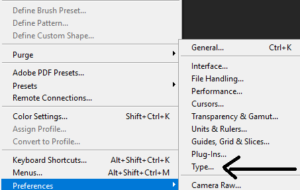
  • Click on Type.
  • A window will appear on your screen. In the Choose Text Engine Options section, select Middle Eastern.
  • After that click on OK and restart Adobe Photoshop.
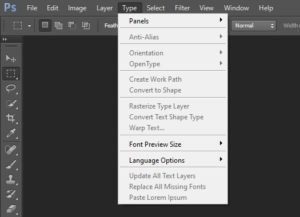
  • Now open Photoshop again and click on Type.

Another screenshot to change the language.

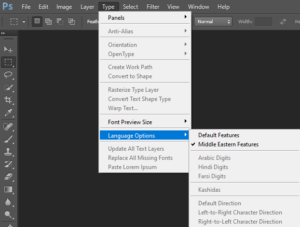
  • Click on Language options and select Middle Eastern Features.

Screenshot to guide people exactly how to change their language to Urdu.

  • Now you need to change the text direction from right to left. To change that you need to go back to language options and you will see right to left text direction option.


Writing Urdu in Photoshop (Mac):

If you want to write Urdu in Photoshop then follow these steps.

  • Open Adobe Photoshop.
  • Click on preferences.
  • Now click on Type.

Image for how to write urdu in photoshop.

  • You have to click on the Choose Text Engine Options, select Middle Eastern.

choose urdu as a language screenshot.

  • Now click on OK and restart Adobe Photoshop.
  • Open it again and click on Type.
  • Now choose language options. You will see different options like Middle Eastern Features, Right to left text direction etc.

This way you can write Urdu in Photoshop. Just follow these steps if you are using Mac or windows. You can select Farsi digits, Arabic digits or Hindi Digits. The settings will vary for different versions of Photoshop but the steps are same.

                                CLICK  HERE

                                                 DOWNLOAD